Business goals like product purchase, form submits or page views within your website can be tracked as conversions. With conversion tracking within our system, you can measure the effectiveness of your campaigns against your business goals.
Client-side pixel tracking is enabled via executing a code snippet on the browser.
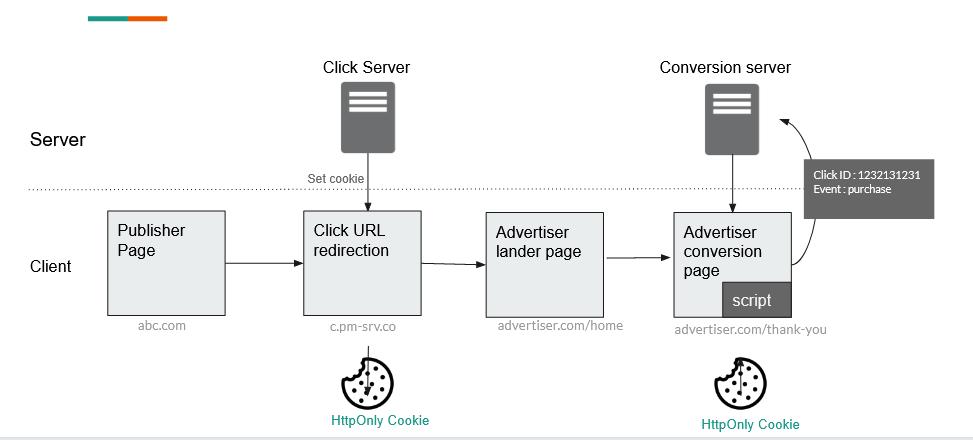
On a conversion event, a JavaScript code snippet placed on your website relays the signal to our servers to record a conversion. The snippet derives the click context to allow us to attribute the conversion to a user ad click. The diagram below details the attribution mechanism.
How to Implement Client-side Pixel Tracking?
Client-side pixel tracking is a simple process where you need to set up the pixel on the portal and then copy-paste the script on the advertiser’s web page. The following steps should be used to manually set up client-side pixel tracking.
- Click Library > Pixel (Client Side).
- Select the advertiser.
- To create a new pixel, click Setup Pixel. However, if you have already set up your pixels, you can create new events by clicking Edit Event > Create Event. The Create Event page appears.
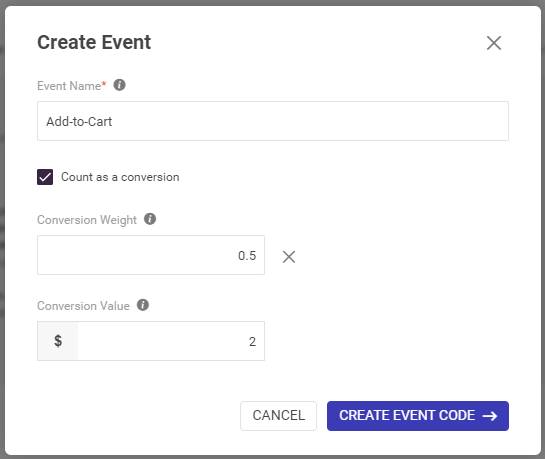
- Enter the event name.
Note: Avoid using URL unsafe characters like empty/blank space and “* < > {}|\^”. For example, instead of Add to Cart, use Add-to-Cart.
- Select the Count as Conversion checkbox to count as attribution.
- If required, you can add a weightage you want for the conversions by clicking the Add Conversion Weight link.
- If required, add a conversion value to attribute a dollar value to that conversion.
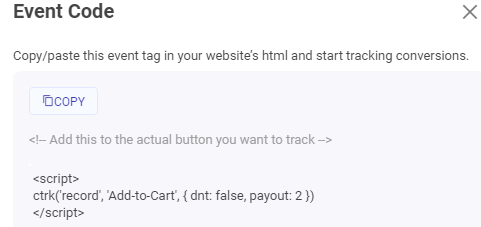
- Click Create Event Code. The script appears.
Important Note: The Event script includes the call to action reference as well. This should be the button on which you want to track the conversion. In the above example, the event is named Add-to-Cart.
- Copy the base script and the event script.
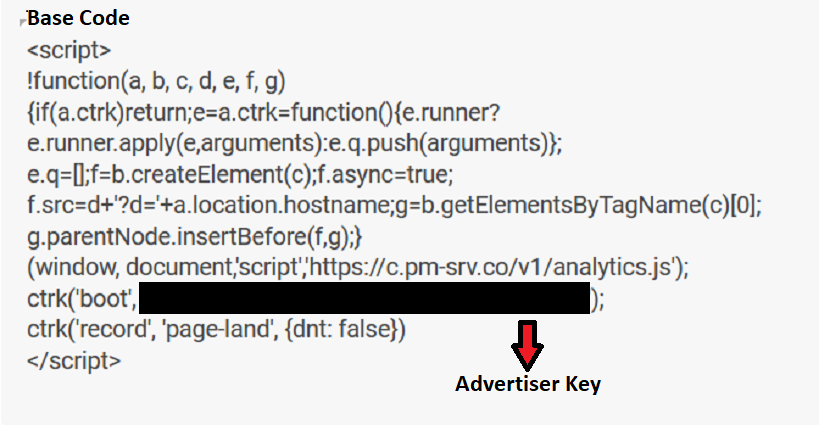
- Navigate to the advertiser’s page and paste the scripts on the web page.
- Select the Conversion Count:
- Count one conversion: Recommended for sign-up, lead generations, and other conversions where only first interaction is valuable. (Will be useful when your goal is lead generation).
- Count all conversions: Recommended for purchase, where all conversions are valuable. (Will be useful if your goal is improving sales).
Note This option set as Count all conversions by default. To change the option, click Edit in the top-right corner.

Parameters of Client-side Script Record Function
The event script contains an optional JSON object parameter section that supports the following properties.
| Property Name | Property Format | Property Description |
| dnt | Boolean | Do not Track property can be set to true to prevent the script from collecting any data on the user. |
| event | String | The event parameter is used to specify the conversion event to be tracked. |
| weight | Float | Weight is an optional parameter typically used to attribute partial conversions. |
| payout | Float | It indicates the $ value of the conversion. |
| transactionId | String | A custom, reportable id against conversions. For example, order-reference numbers, form reference numbers could be used. |
| cid | String | Click id to record the conversion against an ad click. |
How to Test Client-side Conversion Pixel?
- Click Library > Pixel (Client Side).
- Click Test Your Pixel

This will give you information about the last 20 pixels fired. The data will be in the following format:

Can we download all the event pixels?
Yes, you can download all the event pixels by clicking the Download Events button. A CSV file with the base script, event scripts, conversion weight, and conversion values will be downloaded.
What are the things to keep in mind if the landing page domain and conversion domain are different?
In case when the domain changes within the conversion journey, for example, your landing page domain is xyz.com and conversion happens on abc.com, ensure all the macros present in the initial landing URL are present in the new domain. For accurate conversion tracking, it is important to have Click ID (macro {clickId}). For affiliate marketing use-cases, where the offers are dynamic and the domains change frequently, we recommend using conversion tracking via Server side pixel.
Can we place the base script and the event scripts on the confirmation page?
We recommend adding the base script on all the pages of the website. Hence, if you want to add an event script on a page, ensure that you add the base script as well. So, yes, you can add the base script as well as the event script on the same page.
What is the data sent by the pixels?
In the case of the base script, page landing is set as an event. Whereas, event script will send back event name, conversion, payout, and weight.
Do you drop cookies to store information on the browser?
There are two cases:
- DNT=true: In this case, we don’t drop a cookie. We only read our click ID from an already placed cookie during the ad click.
- DNT=false: We drop a cookie only if it does not exist already.
To know more about DNT, click here.